If you don’t know how to tie a spinner bait you’re going to have a hard time using this lure.
Spinners are one of the most popular bass fishing lures because of their flash and vibration.
They create a lot of attention in the water and it’s what makes them such a great choice for spring bass fishing.
When the water is murky and muddy, the spinnerbait shines through and can quickly turn a bad fishing day into one you’ll remember forever.
I’ve had more days like that than I can count on both hands and I want the same for you.
In this guide, I break down all the steps involved to help you learn how to tie a spinnerbait lure.
How to Tie a Spinner Bait: Step-by-Step
If you’d like to watch a video breakdown of how to tie a spinner bait, our very own Wesley Littlefield breaks it down in the YourBassGuy.com YouTube video below!
If you’re someone who prefers to read a walkthrough on setting up the spinner bait, then continue on.
Here’s a quick breakdown of the steps for you:
1. Locate the eye on your spinnerbait.
2. Choose either a clinch or palomar knot.
3. Use that knot to properly secure the line to the wireframe.
4. Test it in the water and ensure the knot isn’t impacting your presentation.
The Anatomy of a Spinner Bait
I think it’s important to discuss and understand the parts of a spinnerbait before breaking down how to tie one.
Knowing the various components that make up a spinnerbait will help you in the long run.
Let’s take a look.
Blade
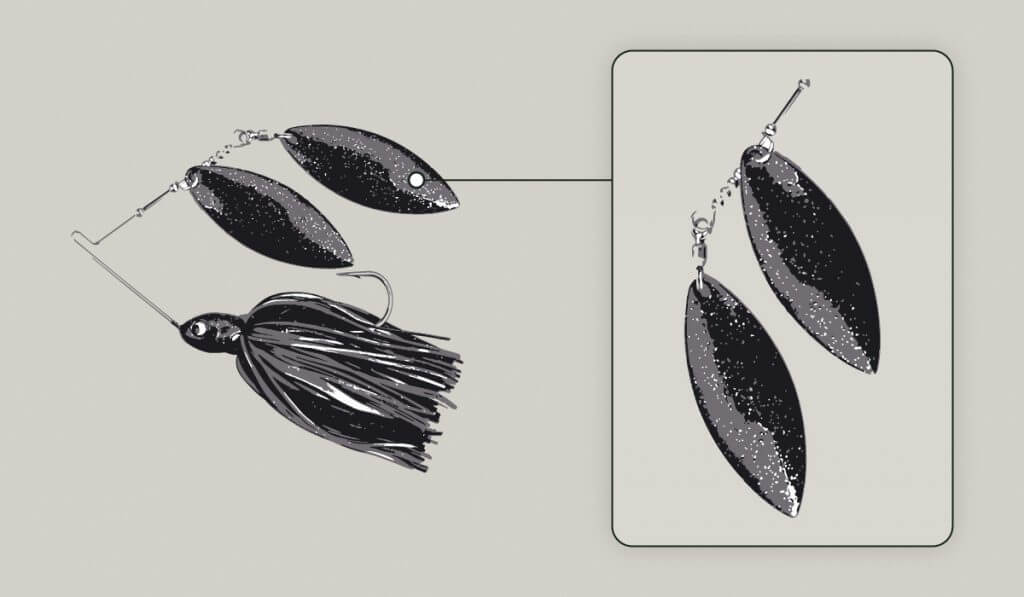
The spinner blade is really the bread and butter of what makes a spinnerbait successful on the water.
It’s the piece of metal (usually stainless) that shines and reflects light when you’re fishing it.
Because of this lure’s ability to glisten, it’s part of the reason why it’s so popular in murky conditions.
When you’re dealing with murky water, fish can’t see the lures as well so they need to either make a lot of noise or shine a lot of light.
Some spinnerbaits even have blades that rattle, similar to a chatterbait.
Within the category of blades, there are actually four different types of blades.
Willow – A willow blade comes to a point on both ends and usually comes with two blades attached to the wire. These blades have a very limited range of motion and they don’t vibrate much.
Their purpose is really to reflect and shine light in the eyes of your target fish so they can see your lure.
Colorado – A Colorado blade is an oval shape attached to a swivel that’s attached to the wire.
Because of the swivel, these blades can spin around entirely which creates a more intense presentation while also shining more light on the fish.
Indiana – Indiana blades are a hybrid between willow and Colorado.
It’s an oval-shaped blade with a point on one end. These bridge the gap between the two by being moderate in both speed and flash.
Willow-Leaf – It’s hard to tell the difference between a willow and willow-leaf blade but these are just a little more rigid and narrow than the regular willow blade.
They’re designed to really help the lure cut through the water and sink faster as well.
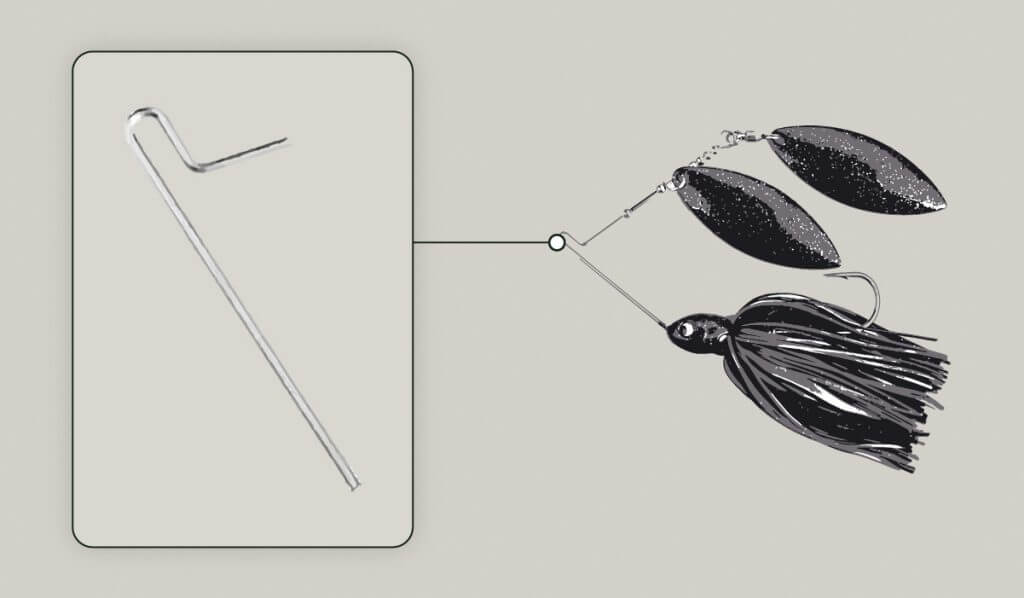
Wire
The wire frame on your spinnerbait is essentially the piece that holds everything together.
Everything is attached to the wire from the blade at one end and the jig head at the other end. The point of the wire is to hold everything in place but also to help the lure cut through the water.
One issue that a lot of people and myself included have with spinnerbaits is the lack of weedless ability.
Lures that have a lot going on have a higher chance of getting hung up and caught in the weeds.
A way that I’ve always combatted this issue with spinnerbaits is choosing a lighter lure.
By going with a lightweight spinner, it makes it easier for the lure to simply glide across the water without sinking down too much.
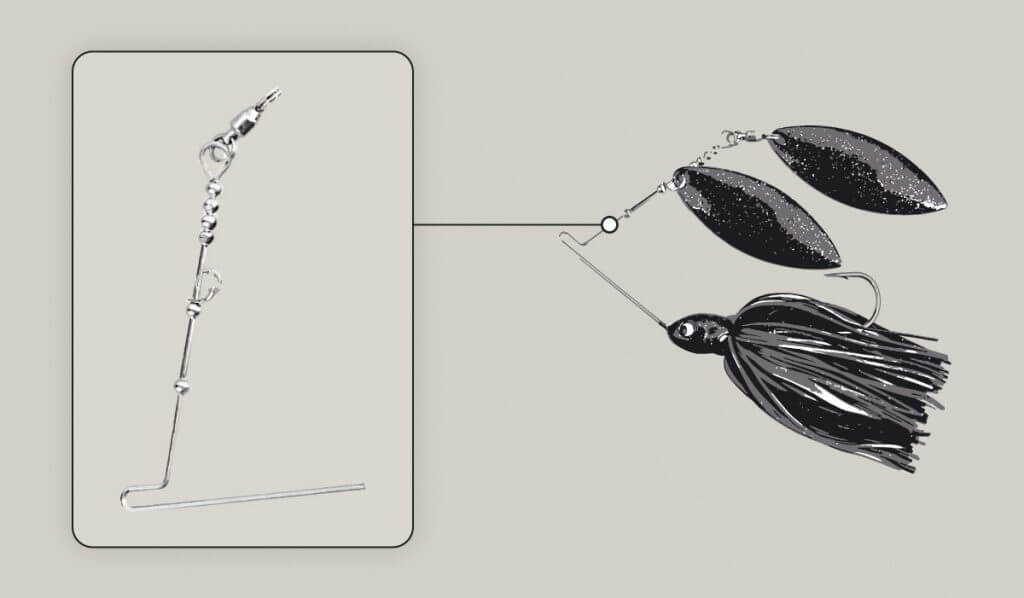
Eye
The eye of the spinnerbait is where you attach your fishing line.
They most commonly come with an R shape so you’re not actually running the line through a loop or “hole” so to speak.
Some spinners have evolved to have a complete circle to help better secure the line but as long as you know how to tie proper fishing knots (which we talk about below), you should be fine.
Jig
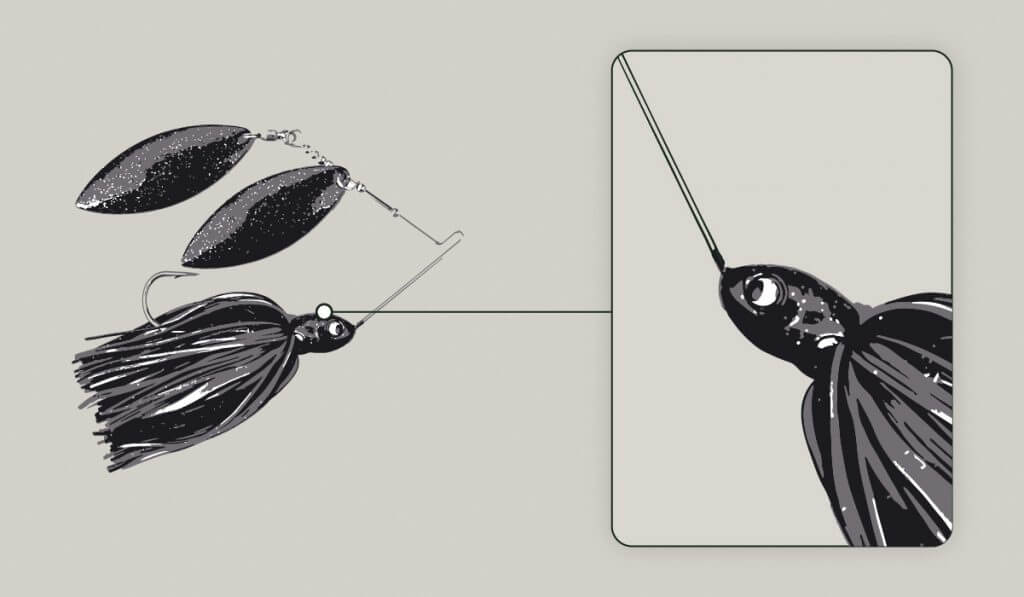
The jig is the head of the lure that’s attached to the other end of the wireframe.
The jigs on most spinnerbaits are pretty typical and nothing you haven’t seen before. The main purpose of the head is to provide weight and balance to the lure.
The ultimate goal with the head of a spinner is to cause the lure to sink just slightly beneath the surface so as you retrieve it, the lure comes back up to the top.
Spinnerbaits are typically surface lures that don’t dive far into the water.
This factor also makes them a great summer bass lure when the bass move deeper and feed near the surface for various insects.
Hook
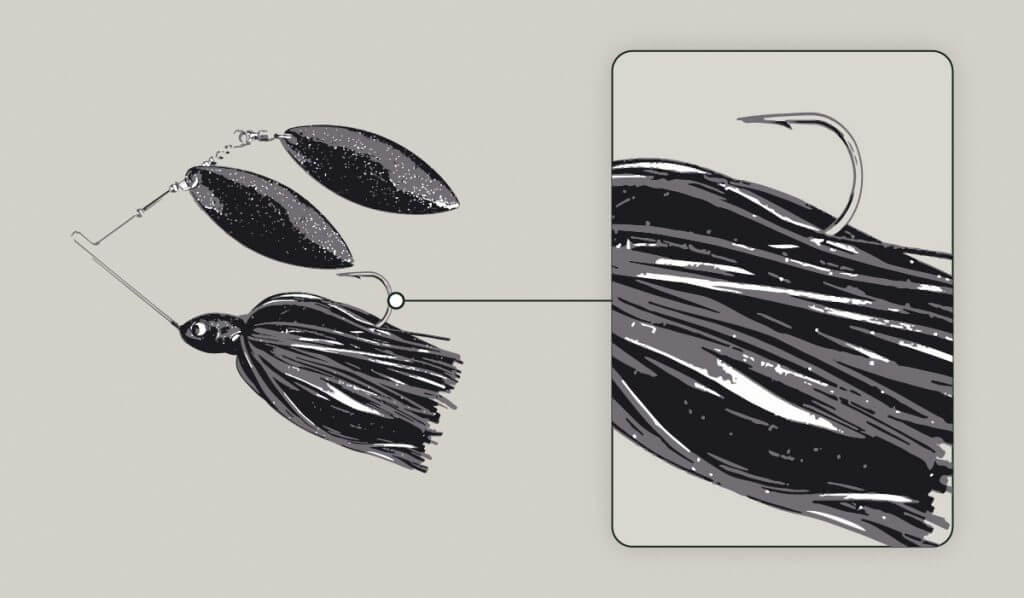
Most spinnerbaits come with a skirted jig to cover the hook. This helps a bit with the weedy issue.
All in all, not much to say about the hook of a spinnerbait, they’re usually a standard straight hook with a barb at the end.
You could put powerbait on the hook to add a scented aspect to your spinner if you want.
Best Knots for Spinnerbaits
At this point you’re probably itching to learn how to tie a spinner bait but to tie one, you need to have good knot tying skills.
One of the most valuable fishing tips I can give you is to help you tie better knots.
The old loop knot isn’t going to cut here because you’re going to get hung up and spinners are not cheap lures.
Clinch
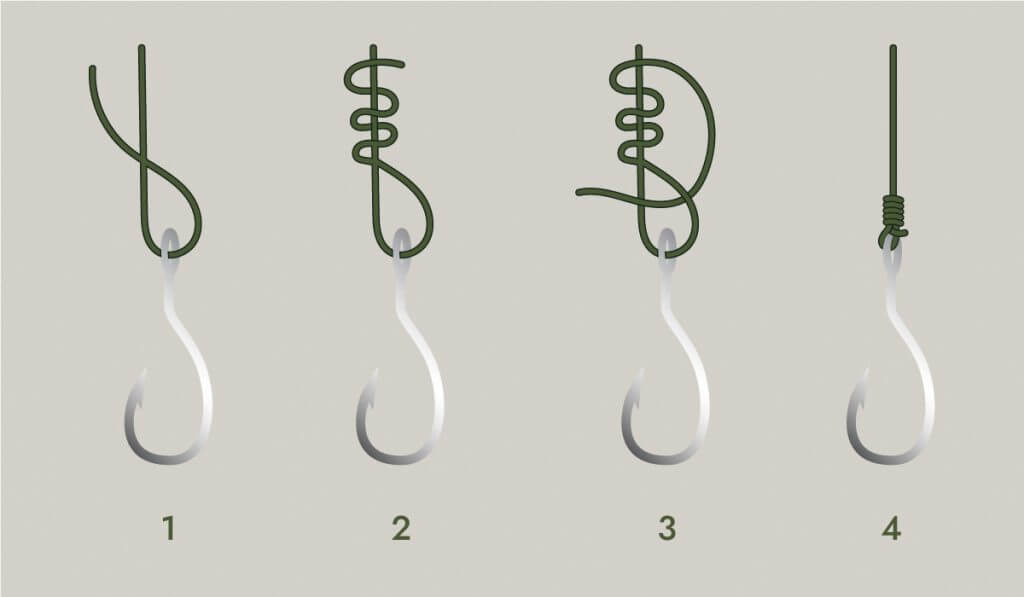
The clinch knot is the most common way to tie spinnerbaits and it works great for monofilament.
Here’s how you do it.
1. Pass your line through the eye and create a loose loop.
2. Run the line over and under the line 5-6 times.
3. Pass the tag end of your line back through the loop you created.
4. Hold everything in place and pull the line tight.
Palomar
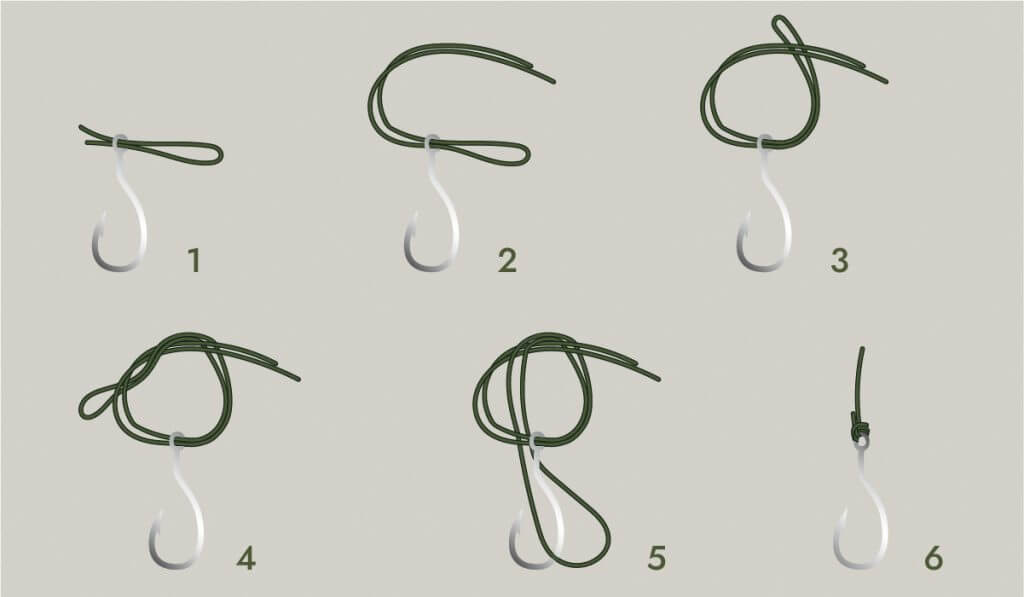
The palomar knot is my favorite for pretty much any lure.
It’s close to an overhand knot but I find that it’s a lot stronger because you’re running two pieces of line through the eye.
Here’s how you tie it.
1. Make a loop with your line, this is called “doubling or double line.”
2. Put the loop through the eye and pass the loop back through the rest of your line.
3. You should have a complete circle now.
4. Put the loop through that circle and pass it back over the hook.
5. Pull it tight and you have a palomar knot.
To make this knot a little better, it’s recommended that you wet it because it will create less friction and decrease the chances of splintering the line.
Trilene
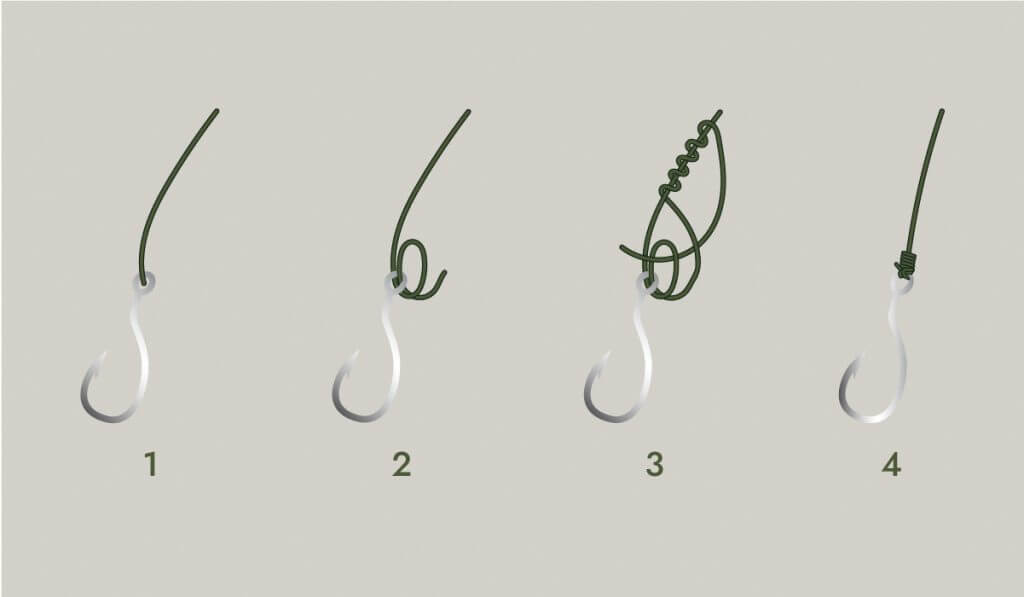
The trilene knot is actually the preferred choice by deep sea saltwater anglers. This knot is commonly used on fishing boats because of its strength.
It’s really just an improved clinch knot for big fish.
Here’s how you tie it.
1. Take your line and pass it through the eye twice leaving a loose loop on the second pass.
2. Make 5-6 twirls around the main line.
3. Pass the end of the line back through the loop you left in the beginning.
4. Pull it tight while holding the end of the line in place.
Choosing the Right Line
When you’re learning how to tie a spinner rig, you really have your choice of line.
Braided and fluorocarbon have won the hearts of many anglers but I still believe in basic and simple monofilament line for my spinners.
Plus, you always have mono in your tackle box.
Spinnerbaits require an active presentation which means you’re going to be working the bait a lot so stretch won’t be an issue.
Sensitivity isn’t necessarily a factor here either since most bass are going to take the lure on its trip back up to the surface.
The focus then shifts to your presentation and your knot-tying skills.
I would spend a lot more time focusing on learning how to properly work a spinnerbait and master some of the knots previously mentioned.
FAQs
If you’ve got questions, I’ve got answers.
Here are some of the most frequently asked questions about tying a spinnerbait.
What is the best knot to tie on a spinnerbait?
Everyone has their own preferences but the clinch knot is probably the best choice for new anglers.
It’s easy to tie and extremely versatile so you can use it with almost any type of lure.
Can you use a swivel with a spinnerbait?
Yes, you can use a swivel but it’s not necessary.
The fact that you’re tying the line directly to the wire frame of the spinnerbait is what helps give it the action it needs to move naturally through the water.
I don’t see a reason why you would need a swivel besides making it easier to switch between lures.
Do you bait a spinner?
This is a highly debated topic and the answer is, “if you want.” Wesley talks about it in the video and I agree with him entirely.
You could certainly add a fluke or swimbait but you don’t need to.
Personally, I like adding Berkley PowerBait to the hook.
A small wax worm won’t impact the presentation but it also provides the element of scent which draws bass to it when they can’t actually see the lure in the murky water.
Get Out There
Well, what are you waiting for?
You know how to tie it and honestly, I hope you’re reading this on your boat or next to the lake so you can put the information into action right away.
Knowing how to tie a spinner bait is important because you can’t just use any knot and expect your lure to stay on, you’re going to lose it.
Plus, the best spinnerbaits are great for catching a wide variety of fish including walleye, largemouth bass, crappie, and more.
Now, get out there and catch some bass. Thanks for reading and as always, good luck out there!
Do you have any fishing tips about tying spinnerbaits? Leave a comment for the community below, we read every comment!
You said you don’t like to use a trailer often one easy hack for hooking a trailer is the tooth pick trick you mentioned keeping it straight but a way to keep it straight is to hold it tight by sticking a toothpick on each side of the hook and cutting it so it’s tight to the trailer which will hold the trailer straight all day long easy trick which saves time and money
Thanks Ryan, we appreciate the tips!